

The Course Builder provides features that allow you to tailor your Blanchard course offerings and customize the learner experience.
If you have not already done so, it is recommended that you review the tutorial on how to create & modify course designs before proceeding with this tutorial.
While this article covers most Course Builder features, it does not include instructions for setting up automated communication plans. Please refer to this article for those instructions.
Course Builder Introduction
Review the video below for an introduction to the Course Builder. It provides an overview of general features and navigation.
Course Builder Activities
The Course Builder’s Activities section serves as the core learning experience of the course. The video below demonstrates how to structure your content and add new activities.
Course Builder Resources
Resources are typically optional or supporting materials that do not require completion. For details on adding resources, see the video below.
Unique Course Builder Components
The Course Builder offers a variety of components that can be incorporated into courses. The following section provides a summary of unique component types.
Automatic/Moderated Events
The Course Builder includes two event types for face-to-face, virtual, and teleconference events:
Automatic: These events are automatically marked as completed once the event’s end date and time are reached.
Moderated: These events require an administrator to manually set the completion status.
Completion of events using either event type can be combined with other Course Builder rules, such as conditional module access that is locked until event completion or automated communications triggered by event completion. In addition, moderated events can be used to record attendance directly within Blanchard Exchange.
Courses provided by Blanchard use the Automatic event type by default. However, administrators can replace these events with Moderated events in custom course templates and/or projects. To do so:
Edit the course.
Select the Activities tab, then select the activity that contains the automatic event.
Select the + icon on the activity to add new content.
Select the appropriate event type under the Moderated heading.
Re-enter the same title and description used for the original automatic event.
-
Delete the original automatic event.*
*Important: If your course includes conditional rules, relative deadlines, or automated communication rules associated with the original automatic event, those rules must be reconfigured to reference the new moderated event.
Repeat these steps for all events in the course that require a moderated event type.
For details on recording event completion for learners using moderated events, refer to this article. Completion data appears in both the Project Status Report and the Detailed Project Status Report.
Adding Images Using Unsplash
Unsplash is an image repository that contains user-submitted images that are free to use for commercial purposes, with no attribution required.
To add images from Unsplash, navigate to the activity in the Course Builder where the image will be added, then select the + icon on the page. Next:
Select the Image option on the left.
Select the From Unsplash tab.
-
Use the search feature to locate images. Once you identify an image, hover over it to display two icons:
The square icon allows you to crop the image before adding it to the activity.
The + icon allows you to add the image without modification.
-
After the image has been added to the page or activity, you can further modify it by hovering over the image. Additional icons will appear with the following options:
The pencil icon allows you to re-crop the image.
The square icon allows you to adjust the image zoom level and alignment.
Icons for copying, deleting, and moving the image are also available.
Assignment Upload
The Assignment Upload feature allows course builders to add assignment submissions to courses. For example, learners may complete an interactive PDF as an assignment. The Assignment Upload feature enables learners to upload their completed PDF files directly into Blanchard Exchange.
Assignments can be configured as simple submissions for the purpose of tracking completion, or they can be set up to require an evaluation process in which a facilitator or administrator reviews the submitted content before the assignment is marked as complete.
To add the Assignment Upload feature to a course, open the Course Builder, locate or create an activity, and select the + icon on the activity. From the left-hand panel, select Assignment Upload.
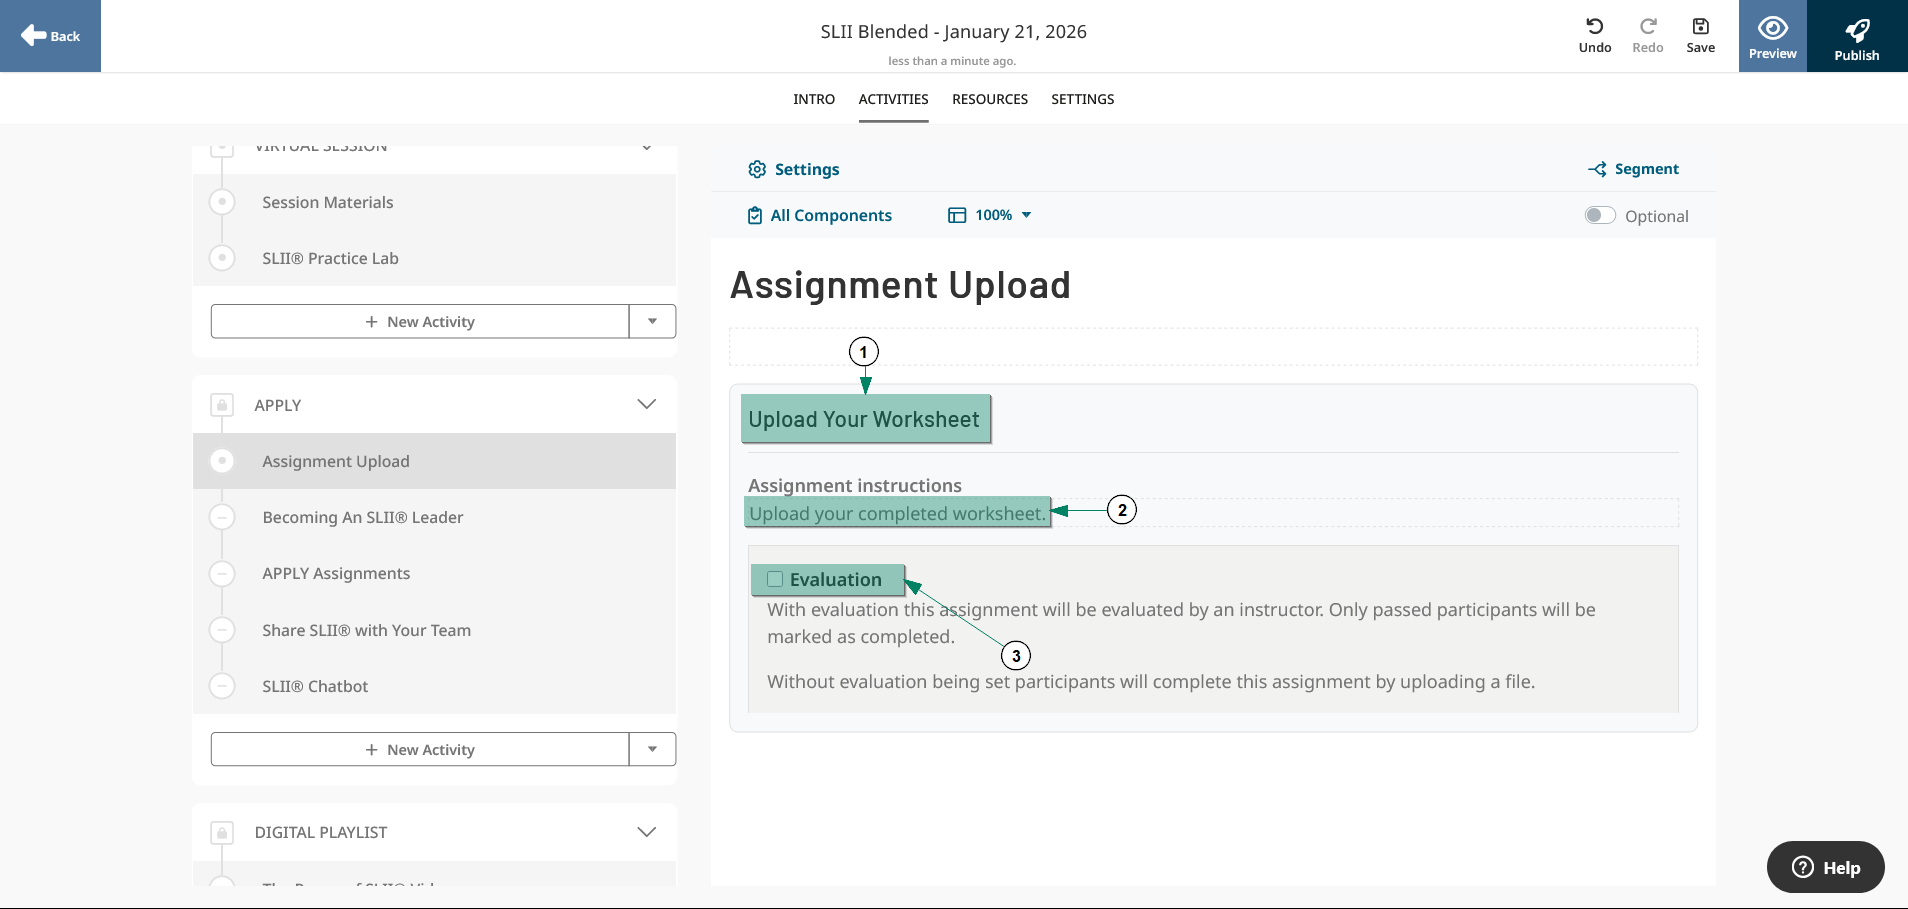
Figure 1
Once the Assignment Upload feature is added to the page, you can enter both a title and a description (Figure 1-1 and Figure 1-2). Also note the Evaluation checkbox (Figure 1-3). Selecting this checkbox enables a review process that requires an administrator or instructor to review and grade the submitted file before the learner is marked as complete.
After learners begin submitting their assignments, submissions can be reviewed from the Assessments tab within the project. Locate the Assignment Upload activity to view a series of statistics indicating the number of submissions and their current statuses. You can select any of the listed totals for additional details.
To review submitted files, select the total for All, For Review, or Reevaluate (if applicable). Once the participant list loads, select the checkbox next to the appropriate learners, then select the Download button (Figure 2-1). You will be prompted to download a ZIP file containing the submitted files.

Figure 2
In addition, if you are using the evaluation feature, you can begin the grading process by selecting one or more learners and then selecting the Evaluate button (Figure 2-2). Selecting a single learner allows you to apply an individual evaluation, while selecting multiple learners enables bulk evaluation using the same grade and optional comments.
On the evaluation screen, the following options are available in the status drop-down menu:
Not Started – Resets the assignment submission status for the learner(s).
For Review – Applied automatically once the learner has submitted their assignment.
Resubmit – Sends the assignment back to the learner, allowing them to submit a new file. This option is useful if the assignment was not completed correctly and the learner needs another opportunity to submit.
Not passed – Indicates that the learner did not pass the assignment.
Passed – Indicates that the learner successfully completed the assignment.
A Comments field is also available, allowing you to provide additional feedback to the learner(s) regarding the evaluation.
Post On Wall (Social File Sharing)
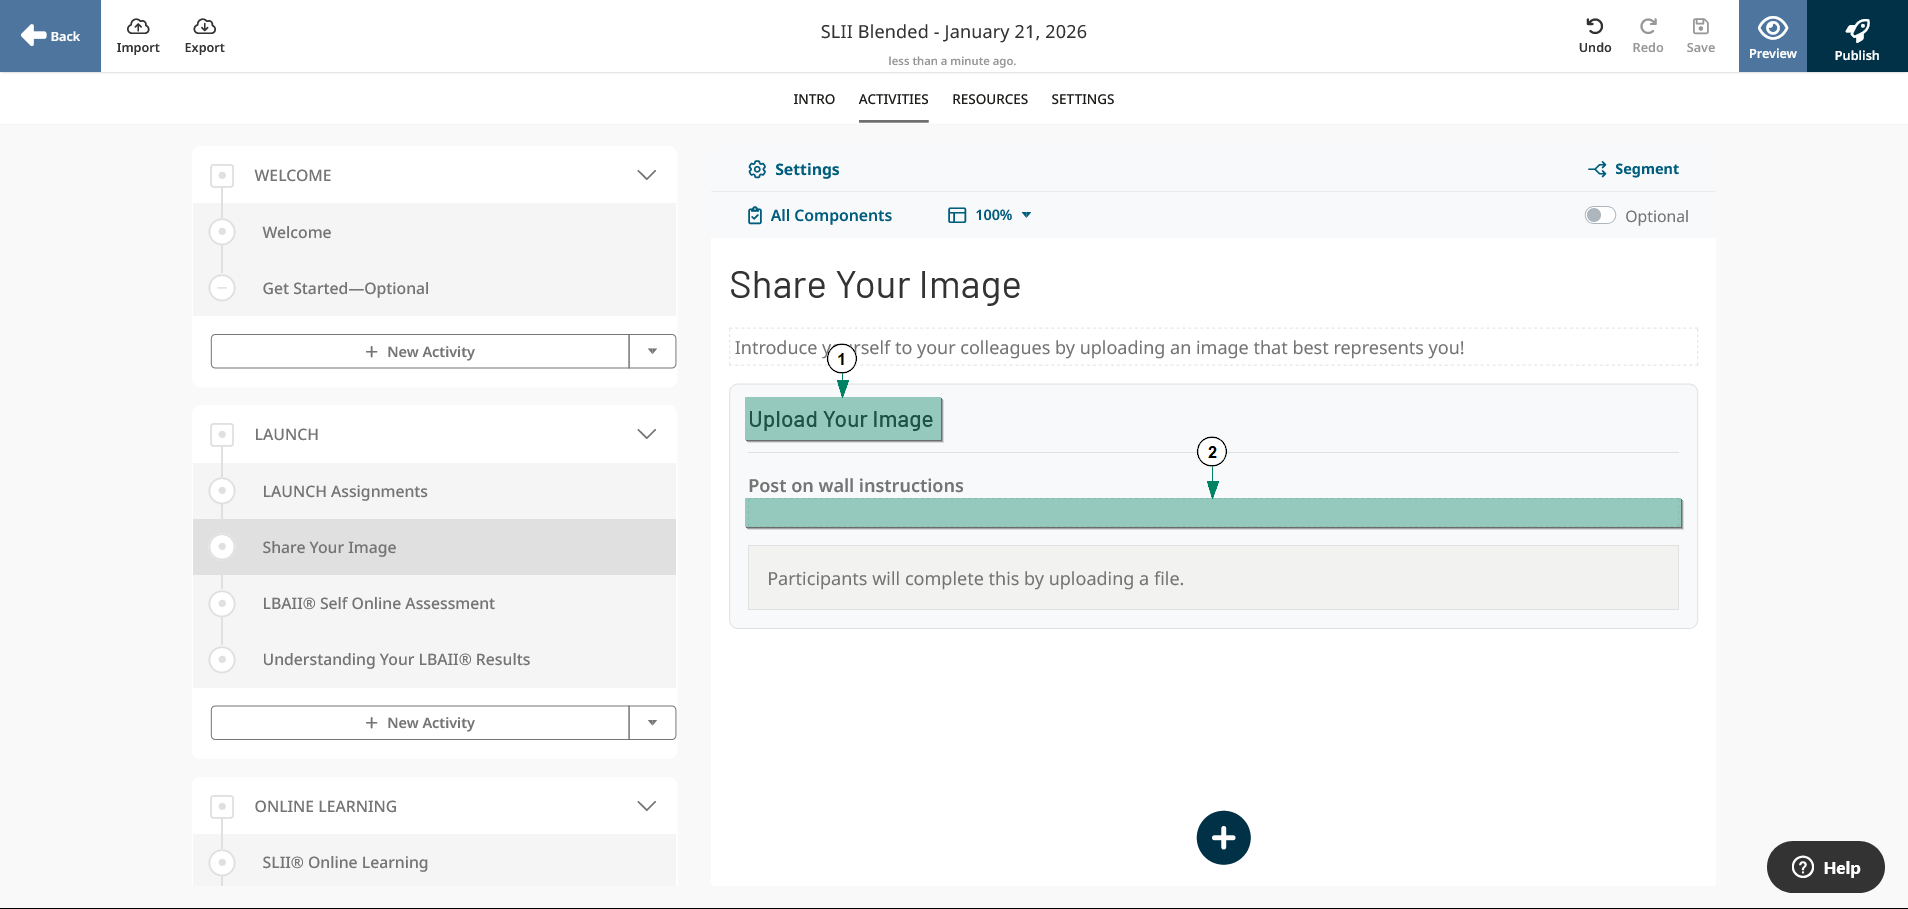
Figure 3
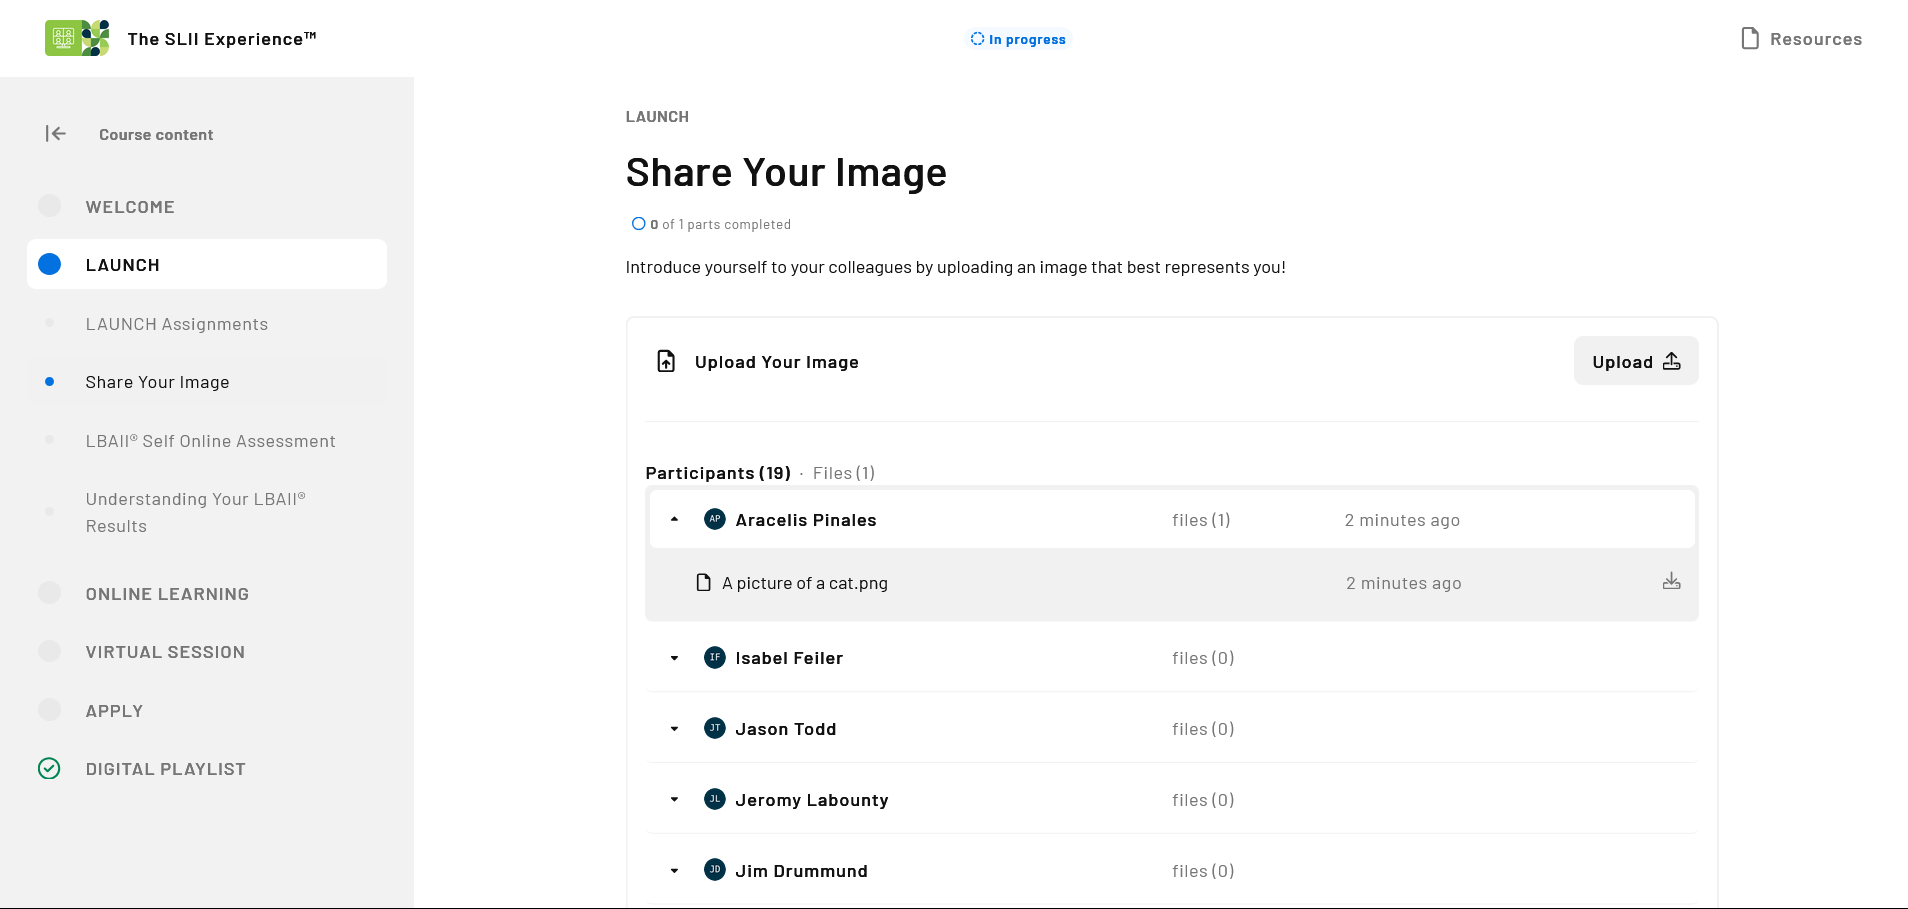
Figure 4
An activity can be added to the Course Builder that allows learners to share files with others in their project or cohort. For example, this could be used as an icebreaker activity in which learners share an image that best represents them.
To add this feature to a course, open the Course Builder, locate or create an activity, and select the + icon on the page. From the left-hand panel, select Post on Wall. This feature allows you to include both a title (Figure 3-1) and a description (Figure 3-2).
An example of how this activity appears in the Learner Portal is shown in Figure 4.
Required Components (Optional Assignments)
If you have an activity or page with multiple assignments, you can mark specific assignments as optional. This allows you to require one or more assignments while also providing supporting materials that learners may optionally download or complete.
To mark specific assignments as optional, open the Course Builder, locate the activity, and hover over the activity in the left-hand panel. Select the three dots icon, then select Settings.

Figure 5
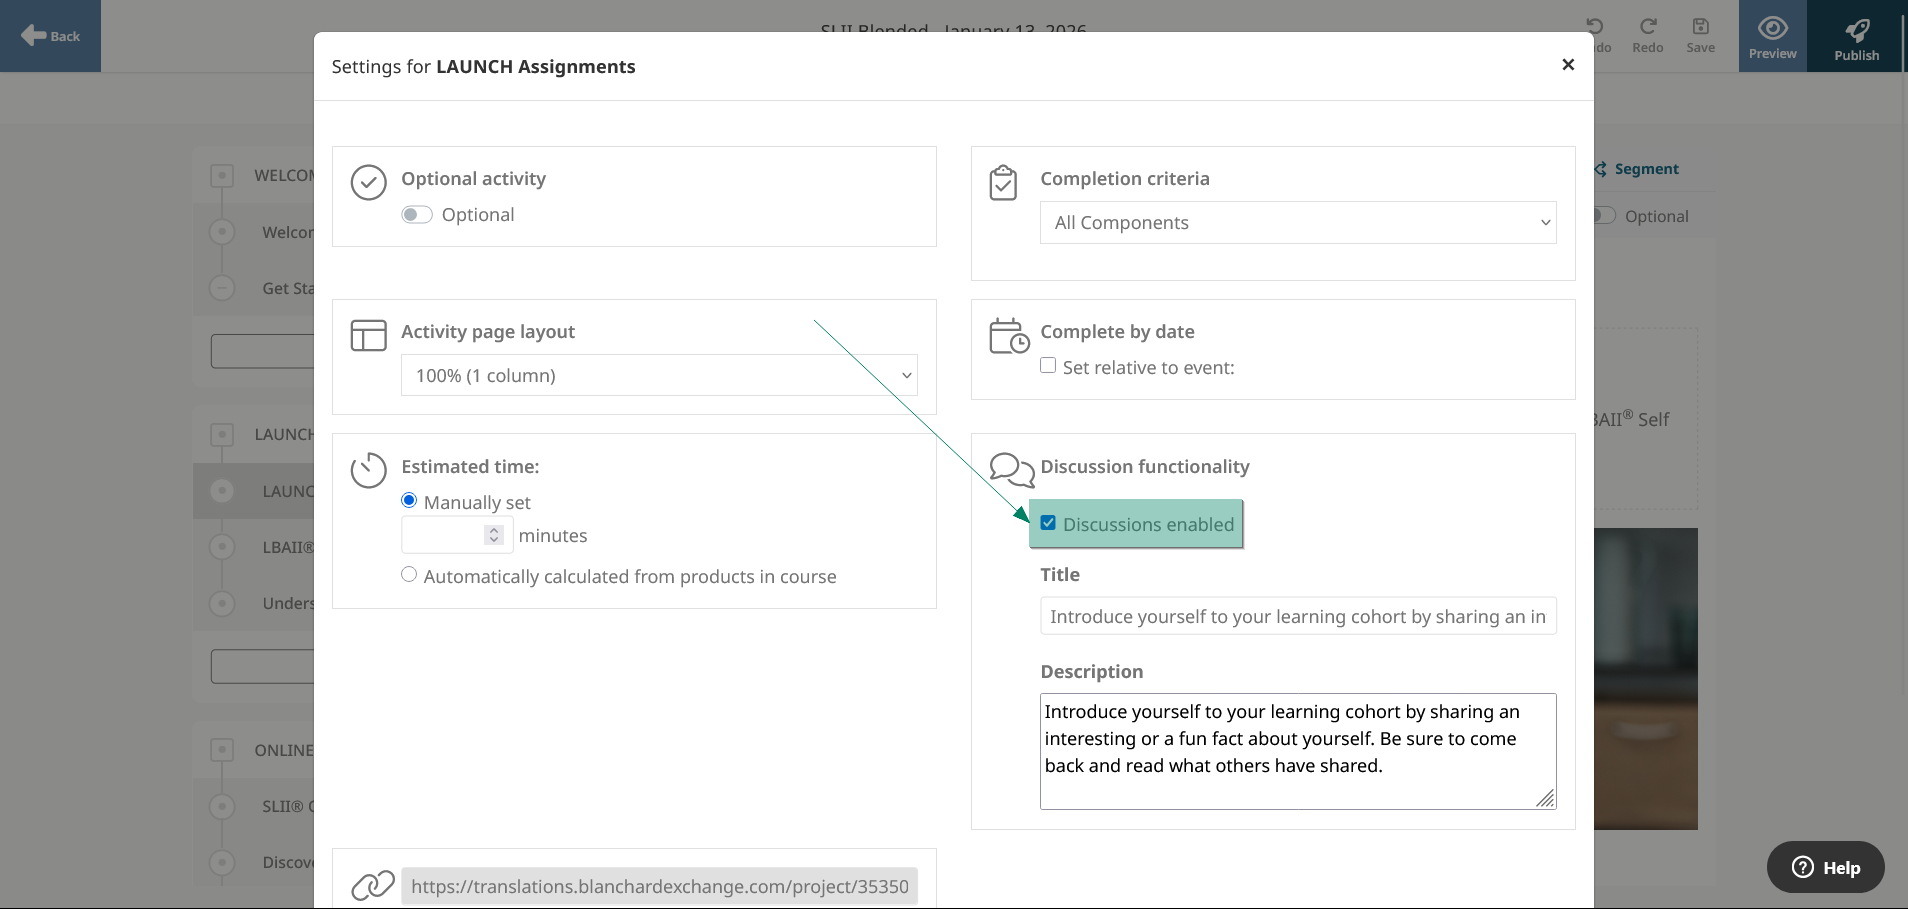
Figure 6
Change the Completion Criteria drop-down to Required Components (Figure 5-1).
All individual assignments within the activity will be listed with their checkboxes selected, indicating that each assignment is required by default.
Locate the assignment or assignments you want to mark as optional, and deselect the checkbox to the left of those assignments (Figure 5-2). The deselected assignments will no longer count toward activity completion or overall course completion.
Discussions
Online discussions can be enabled directly within course activities. Learners can post comments and receive replies from others in their cohort. Project Trainers, Account Trainers, and Administrators can monitor discussions and post responses.
Discussions can be combined with other assignments, such as asking learners to watch a video or read an article and then share their thoughts. Alternatively, discussions can be enabled as standalone activities without accompanying assignments.
To enable a discussion on a course activity:
Open the Course Builder, select the Activities tab, and navigate to the activity where the discussion should be enabled. Alternatively, you can add a new activity to the course.
Select Settings at the top of the activity.
Under the Discussion Functionality section, select the Discussions enabled checkbox (Figure 6). This setting can also be used to disable a previously enabled discussion.
(Optional) Enter a title and description for the discussion. These can be different from the activity’s title and description.